
Although hardwood flooring looks beautiful when it is first installed, their appearance can fade over time. Wood flooring will last many years but it will need to be maintained regularly. Traditional hardwood floors can develop cracks over time. It can be frustrating but this is part of how wood reacts to the environment. Wood flooring dries out and loses moisture due to wear and tear, exposure, and humidity. Wood flooring will shrink and change in shape as a result. The problem may be worsened if boards are not properly laid. Also, gaps can occur if the flooring has suffered from water damage or dry heat damage.
Sometimes minor gaps can be left alone for the first time. If the gaps between the wood floors are too large, it can pose a danger to tripping hazards, especially if the tiles begin to curl. These gaps can also become unattractive and collect dirt. You will need to repair your hardwood flooring before this happens. This guide will show you how to fix any gaps in your wood floors.
Determining if there are gaps that need to be filled
It is a good idea, if you notice a small gap in your wooden floors just now, to assess the situation thoroughly before taking any immediate action. All real wood floors can expand and contract. These changes are caused by seasonal weather changes and fluctuations in humidity. These minor gaps are not alarming and should be taken as a sign of a temperature change. You may notice tiny gaps during winter, which can be almost invisible in warmer months. It is not a good idea to alter them too often. Filling in the gaps could cause the wood floors to expand more when the temperature changes. This could lead to boards buckling. It is important to determine if the gaps in your wood floors are severe or minor. You can determine the severity of the problem and take the necessary steps to fix it.
Do not wait for the humid season
Older floors may develop gaps that are almost permanent. These gaps are not affected by humidity changes. To confirm that this is true, it’s a good idea not to wait until the humid season to inspect your boards. The boards will be the tightest when the wood is swollen. You can check the condition of your wood flooring. You will need to repair if there is enough space left to insert a coin. It is best to repair the gap when it is narrowest. The humidity will not be at its highest so you can get the best results.
Make sure to clean out all debris in between the gaps
You’ve made the decision to fill in the gaps. Now it is time to clean up the floors. You will need to remove any debris from the gaps. It will vary depending on the amount of space available. You will need to vacuum the floor with a powerful tool. To remove any debris that the suction power didn’t capture, you can use a sharp object to run it between the gaps.
Filler
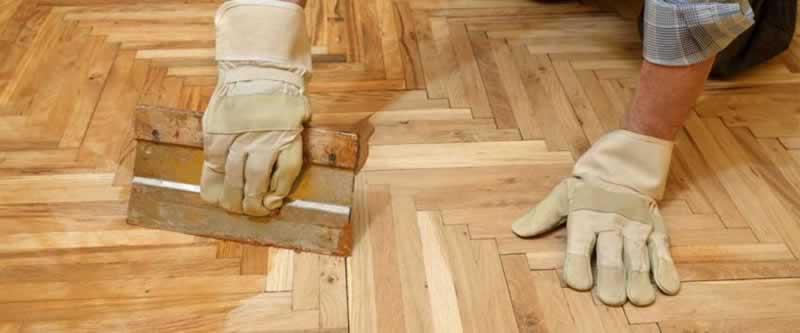
After you are satisfied with the cleanliness of your gaps, it’s time to apply your filler. There are many fillers that can be used to accomplish the task. If used correctly, most fillers are perfectly acceptable. There are three options: putty, powdered (which can be mixed to form a paste or putty), or caulking. Choose the filler you are most comfortable with. Follow all instructions carefully. It is important to fill all gaps, so it is a good idea to allow for some overfill.
Sand and stain
After filling all gaps, allow the filler to dry completely before you sand down the floors or apply the finishing touches. You may need to stain more or less depending on what type of floor you have and the filler you used. Be patient when sanding or timber floor staining. Make sure your sanding is smooth. To achieve a pleasing appearance, apply as much stain to your liking.